1.21. Registry Editor
The registry editor is a GUI that gives enables you to look at and also modifiy the central device registry. For usage examples please look at the manual section below.
1.21.2. Interfaces
| Scope (Listener) | Type |
|---|---|
/devicemanager/registry/status |
DeviceRegistry |
/locationmanager/registry/status |
LocationRegistry |
/appmanager/registry/status |
AppRegistry |
/agentmanager/registry/status |
AgentRegistry |
/scenemanager/registry/status |
SceneRegistry |
1.21.3. Manual
- Register a new device class:
- First off right click on an existing device class or on empty space in the device class tab and chose “add” in the context menu. At the end of the list a new device class will be added which now can be altered. Simply expand the new device class entry and double click in the value column on a line to alter the value. An editing panel like a text field will appear where you can alter the value. After editing just press enter or click outside the editing panel to finsh the editing process. Some values like the id of a device class, which will be generated by the device manager, cannot be changed. Therefore you are not able to alter these values and they should be grayed out when existant. Furthermore there are lists like the entry node under metaconfig or the unit template config node.Just right click on these nodes and chose “add” from the appearing context menu to add a node to these lists. For unit template configs you should set a type after which the registry editor will automatically set the according service template. The minimum amount of fields set for a succesfull registration are company and product number. After setting at least these values you have to press the apply button in the line of the new device class in the value column. Then the device class will be registered in the central device registry and the registry editor will update accordingly.
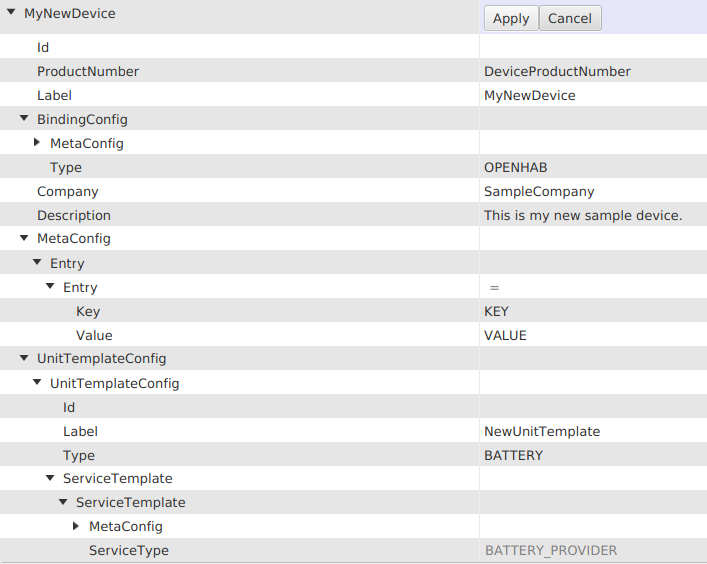
Example of a newly added fully expanded device class.
- Register a new device config:
- To add a brand new device config right click on empty space in the device config tab and chose “add” from the appearing context panel. To simplify The adding process and for a better overview the device configs are ordered by their device classes and their location. If you want to add a device config to one of these groups right click on the group or a device config in one of these groups and also chose “add” from the context panel. The registry editor will automatically set the device class (and location) for the new device config according to the group. Afterwards expand the new device config. Edit values by double klicking on the according line in the value column. The minium amount of fields set for a succesfull registration are device class id and serial number. After setting at least theses values press the apply button to finish the registration process.
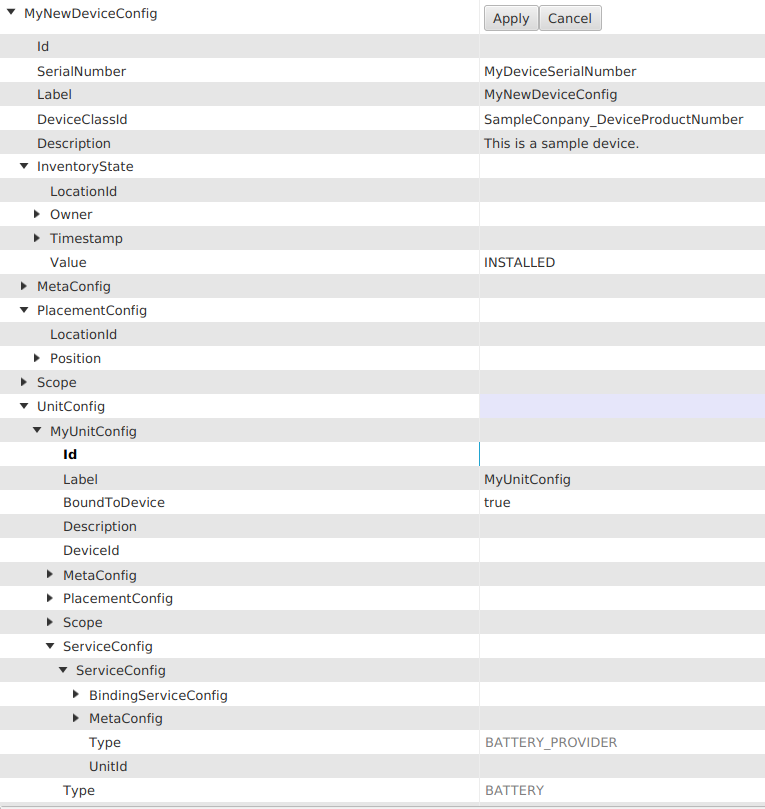
Example of a newly added expanded device config.
- Borrow a device:
- Navigate to the device config of the device you want to borrow. Expand the inventory state of the device config and set its value to borrowed. In addition you should expand the owner node in the inventory state and enter you first-,last- and user-name. Then simply press the apply button to update the device config in the central device registry. If you brought back the borrowed device set the inventory state to installed or in-stock and remove your data from the owner node.
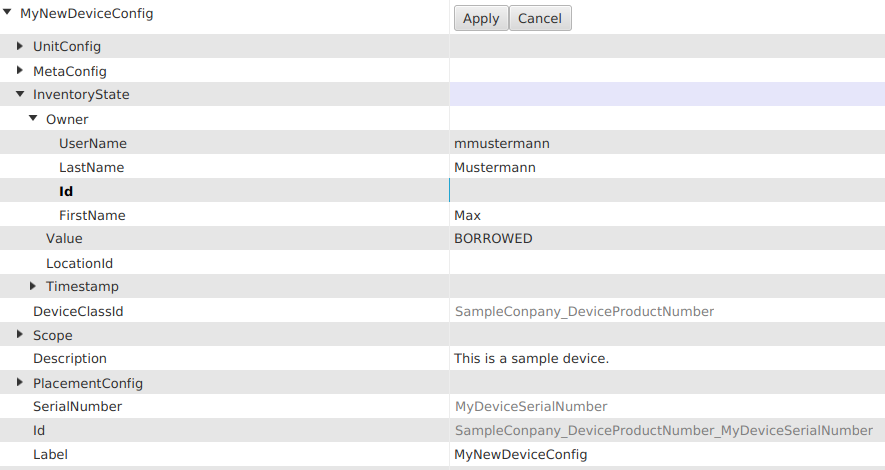
Example of a the borrowing process.
- Register a new location config:
- Open the location registry and right click an empty space or an existing location config and chose “add” from the context panel. Expand the added location config and you will be able to alter its fields. The only field that has to be set for a succesfull registration is the label. After setting at least this field press the apply button to register the location config.
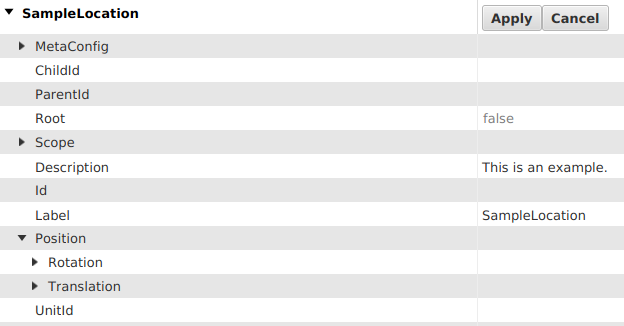
Example of a newly added expanded location config.